Using ollas is a low-tech, low-maintenance way to efficiently and automatically water your vegetable garden without daily monitoring. These unglazed clay pots have been used for centuries for irrigation, and are now enjoying a resurgence in popularity among backyard gardeners and small-scale farmers. Learn how to make your own DIY ollas at home with inexpensive supplies!
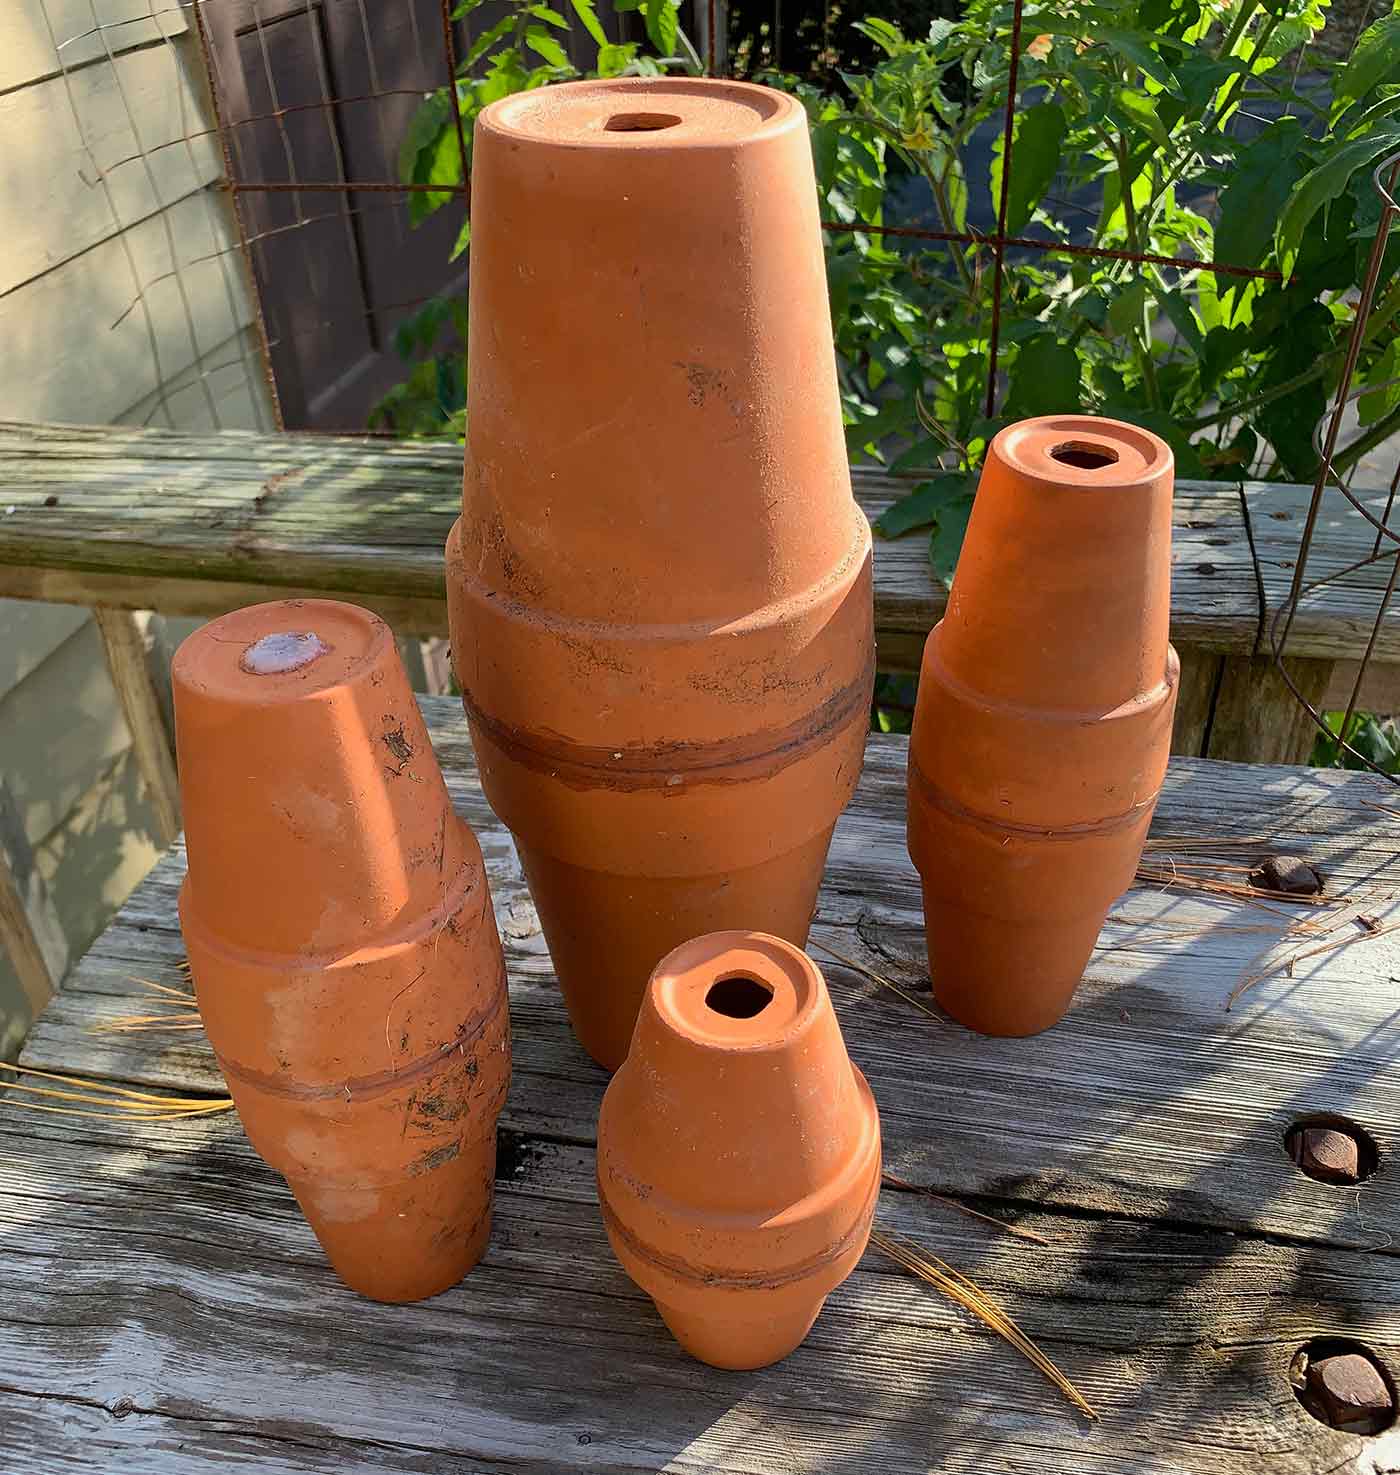
Not only are ollas an eco-friendly and sustainable way to grow vegetables, but they can also help increase yields and improve the quality of your crops. In this article, we’ll explore the history of ollas in gardening, the benefits of using them for vegetable gardening, plus a step-by-step guide for making homemade ollas for your own garden. So, grab your gardening gloves and get ready to discover the wonders of ollas!
What are Ollas?
Ollas (pronounced OY-yahz, or olla singular OY-yah) are part of an ancient but highly efficient irrigation system for vegetable gardening, especially in areas with hot and dry climates. They are simply unglazed terracotta pots that are buried in the soil next to a plant’s root systems, with an access opening above the soil surface.
You fill the pot with water, which slowly seeps through the porous clay material providing a steady supply of moisture to the plant’s roots.
History of Ollas in Gardening
The use of ollas in gardening has a long and fascinating history that dates back thousands of years. The origins of ollas can be traced back to ancient cultures in regions such as China, Iran, and the Americas, where they were used for both cooking and irrigation.
In the Americas, indigenous peoples have used ollas for irrigation for centuries. In Mexico, for example, ollas have been used for irrigation since pre-Columbian times, and the technique is still widely used today.
The use of ollas for irrigation has experienced a resurgence in popularity among gardeners and small-scale farmers around the world, as people seek more sustainable and water-efficient methods of growing crops.
Today, ollas are used in small-scale agriculture, backyard gardening, and urban farming, and their versatility and effectiveness make them a valuable tool for anyone interested in growing their own food.
You can find a variety of artisan ollas for sale on sites such as Etsy. But they’re also easy and cheap to make at home!
What are the advantages of using ollas for irrigation?
Reduced water stress: During hot, dry summers, the vegetables can experience increased demand for water, as it evaporates more quickly on leaves and soil before it has time to nourish the plants. This is especially true for vegetables planted in containers.
Because the olla’s water compartments sit below the ground, it’s protected from the effects of the hot sun, and the water doesn’t evaporate nearly as quickly.
Then, the slow release of the water through the walls of the ollas provided a constant source of nourishment directly to plants’ roots, which can lead to more robust and healthy growth.
Depending on the size of the olla, you can reduce watering — that is, filling the ollas — to every other day or longer, while being confident that your vegetables are not undergoing water stress.
You’ll also never overwater your plants. Some plants do not like to have wet feet, and soaked soil or puddles of water can promote bacterial diseases.
Low maintenance: Once the ollas are installed, they require very little maintenance, making them a great choice for gardeners who don’t have the time or resources to tend to their plants regularly.
Increased yields: Because ollas provide a steady supply of moisture to the plants, they can help increase yields and improve the quality of the vegetables produced.
Environmentally friendly: Ollas are made from natural materials and can be reused for many years, making them an environmentally friendly choice for gardeners. At this point, the homemade ollas you see in the photos on this post are over five years old, and have successfully survived very cold winters in an unheated garage.
Water conservation: Ollas are an efficient way to conserve water because they only release the water the plants need, reducing water waste through evaporation or runoff.
How to Make Homemade Ollas
Although you can find beautifully made artisan ollas, they’re often quite pricey and cost prohibitive if you plan to incorporate them in a significant way in your garden. And because they’re buried in the ground and unseen, it’s a hard swallow for me to fork over $20 or $30 for such an item.
You can also find cheaper stake-shaped containers, but for my purposes, they don’t hold nearly enough water for my big fruiters, like peppers, eggplants, and tomatoes.
Instead, we’ll be making DIY ollas with common terracotta pots that are easily sourced at any garden center.
We’ll also be using waterproof silicone to seal and “glue” the ollas. Optionally, you’ll need a drill or dremel tool for widening holes in the pot (I’ll give a workaround if you don’t have them).
Overview
We’ll be gluing two terracotta pots together, rim to rim, to make one big water container. We’ll seal one of the pots’ holes completely shut, and leave the second hole open.
The sealed end goes into the ground first, while the open end remains above the ground’s surface. This is where you add water throughout the season.
Why use two pots? Why not just bury one pot and save the gluing effort?
Great questions! The advantage of two pots is that the elongated water chamber reaches deeper into the soil: Literally twice as deep as one pot alone. For plants with big root systems, such as tomatoes, peppers, and even herbs like basil and parsley, a single pot is probably inadequate to water the plants sufficiently throughout the season.
Plus, a double-pot simply holds more water and needs less refilling!
Equipment you’ll need
- A pair of unglazed, unpainted terracotta pots. Choose a pair whose rims sit fairly tightly and evenly together. They don’t have to be perfect, just close! The better the fit, the less silicone you’ll need to use.
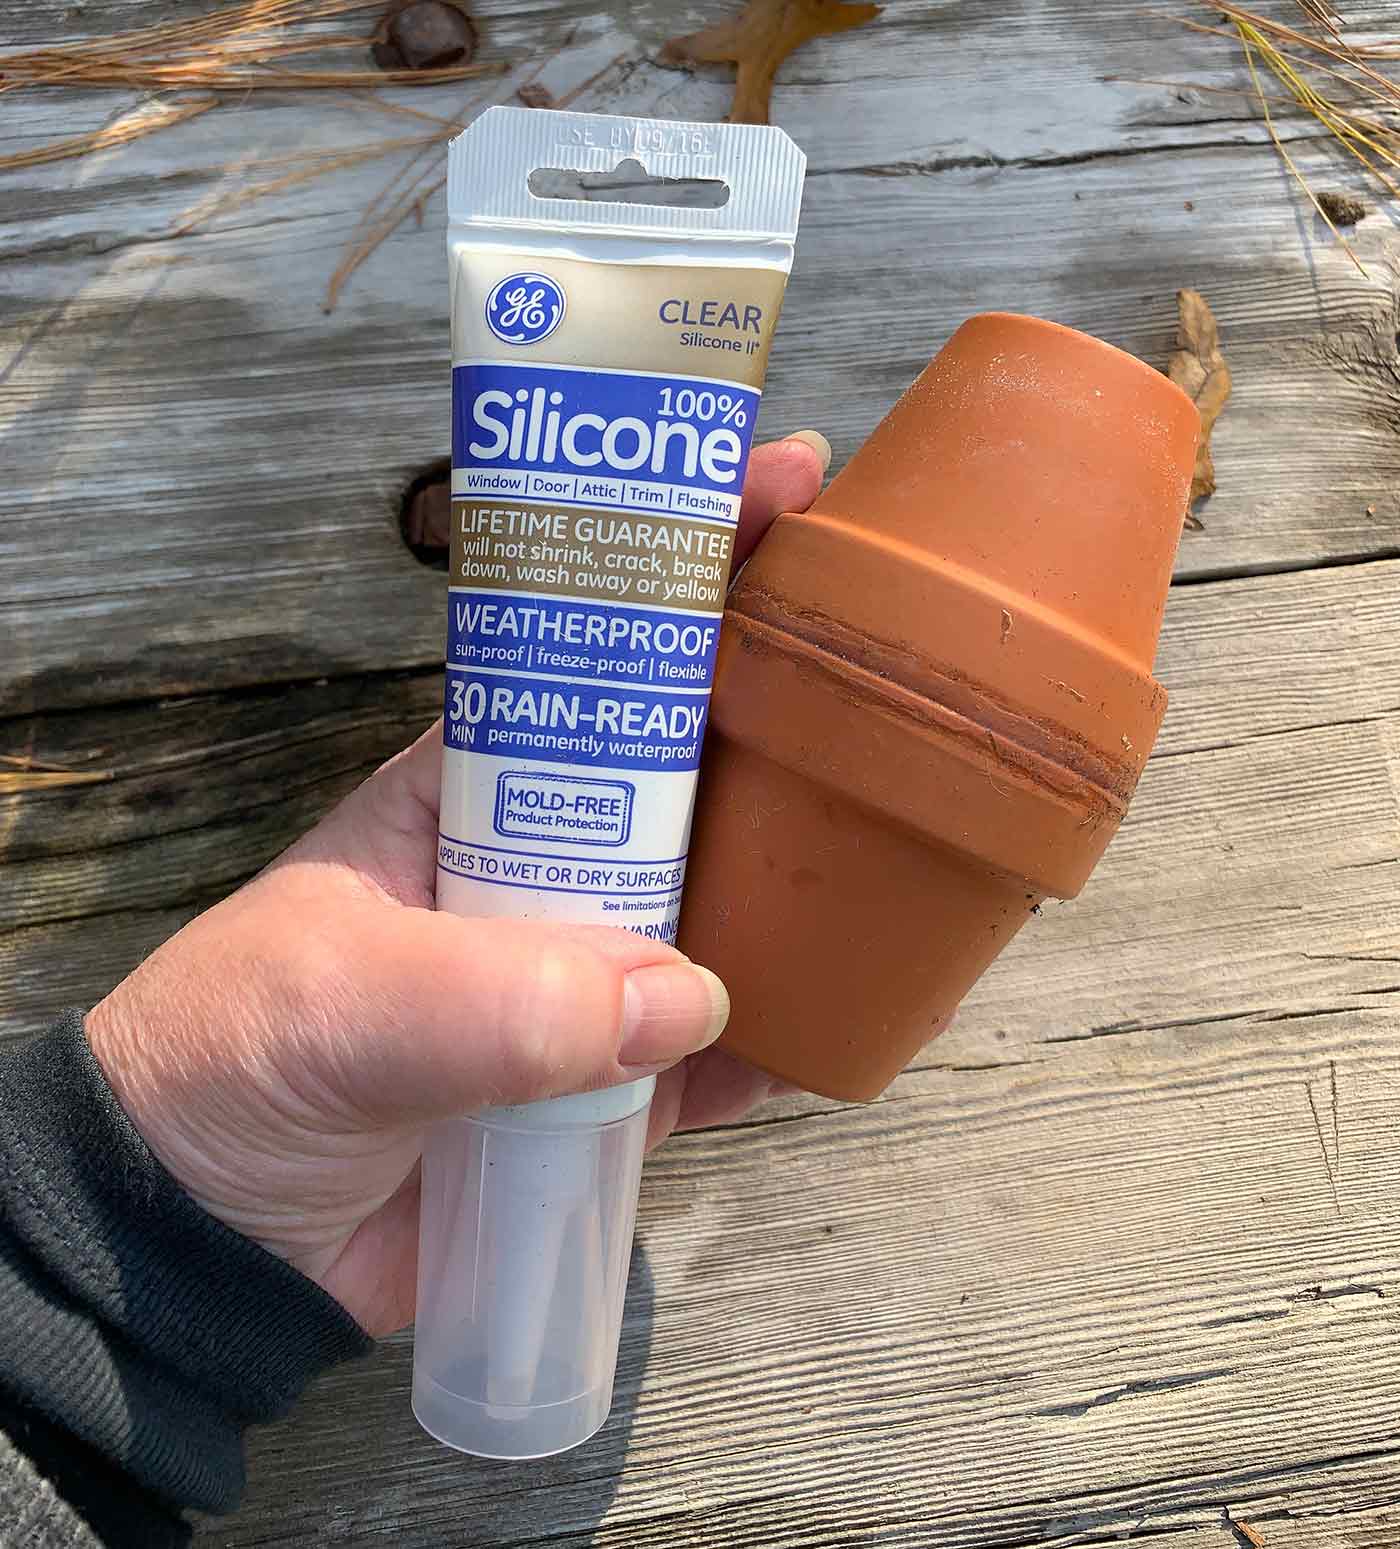
- Waterproof silicone. This comes in a squeezable tube. You don’t need a caulk gun, as the tube is quite manageable by hand. Make sure you choose a brand that resists cracking. This will be the “glue” that holds the pots together and seals the one hole.
- A drill or (better) a dremel tool. I usually like to widen the hole that will be accepting the water, just to keep down on water loss during olla refills. This is optional, though. A funnel with a spout that fits the hole is perfectly usable.
- A paper towel or rag.
- A cover for the top of the olla.
Join the two pots together
Follow the directions on the tube silicone to prep it for use (sometimes you’ll need to knead the tube; sometimes no prep is required). Use scissors or shears to clip off the tip of the tube at a slight angle.
Ensure the rims of both pots are completely dry and free of dirt and debris.
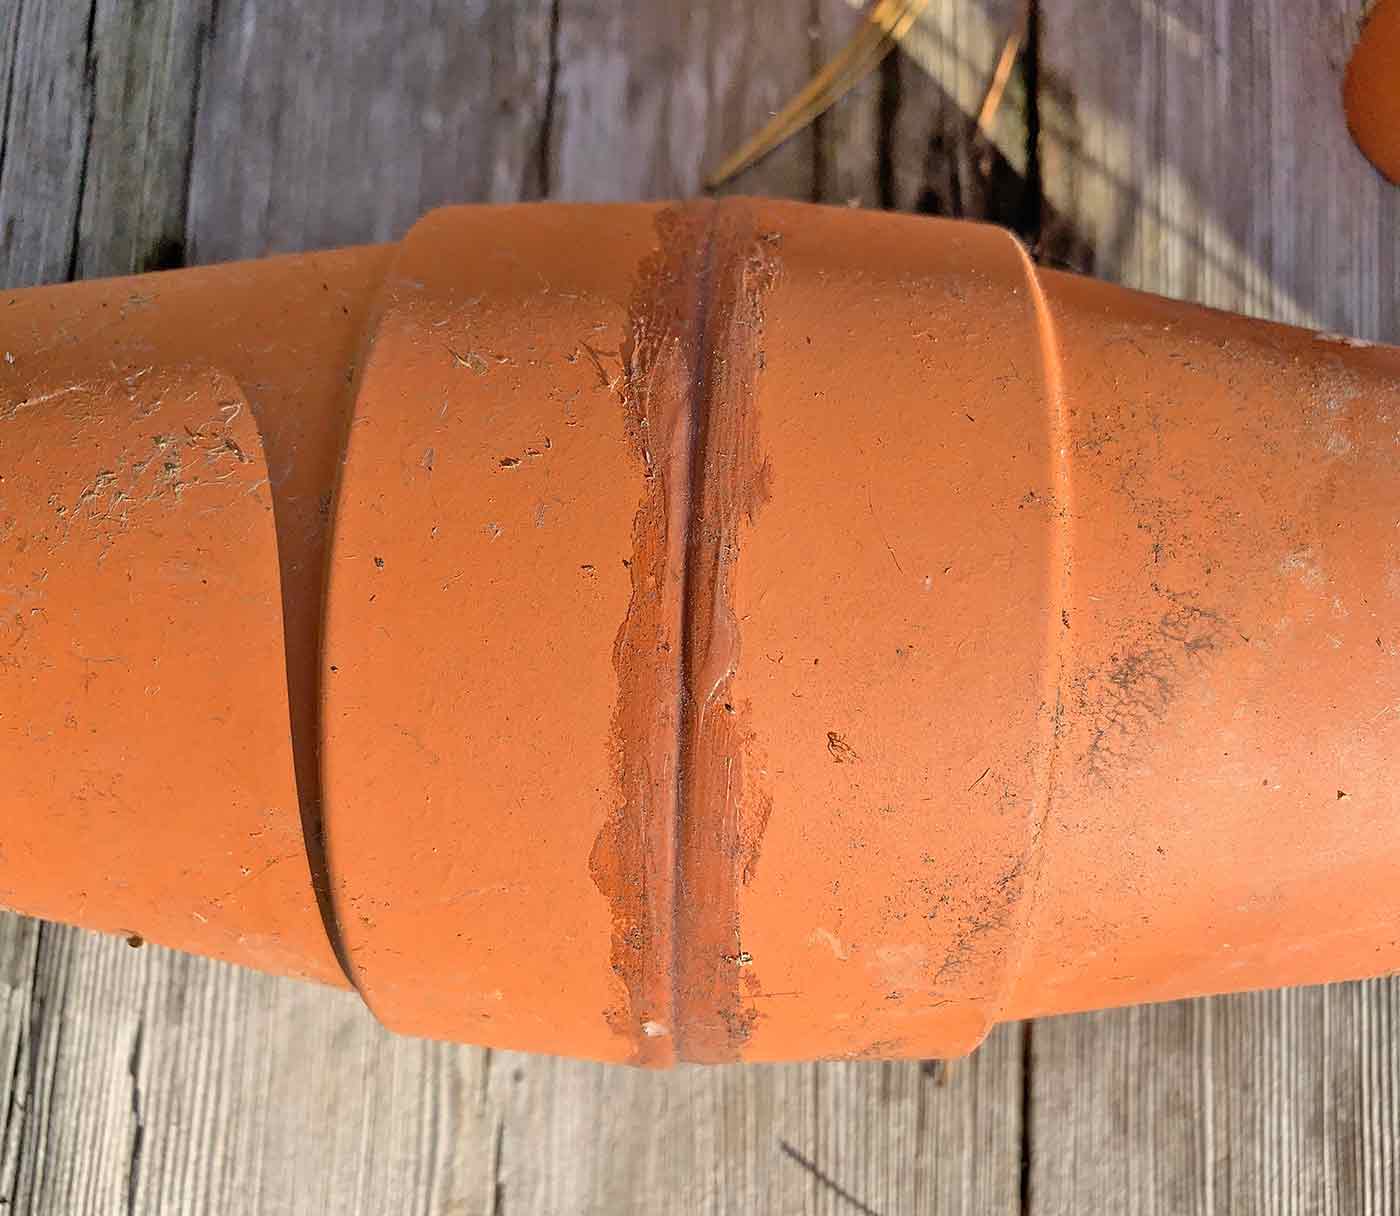
Apply a continuous bead of silicone around the rim of one of the pots. The bead should be as thick as the rim.
Attach the second pot to the first pot, rim to rim, twisting and adjusting the second pot until they are evenly joined.
Wrap a paper towel or rag around your index finger and smear the silicone which has bubbled out around the rim to create a solid seal. You won’t need much. But don’t hesitate to add another bead to a bare spot.
Let the pots set until the silicone is dry (refer to the package directions).
Seal one of the pots’ drainage holes
Apply a thick bubble of silicone across one of the drainage holes to seal it completely. Apply a bead in a concentric swirl pattern is quick and efficient. Make sure that silicone overlaps the hole’s edges, to form a complete seal.
Let dry thoroughly.

Test the seals
Fill the olla with water through the open hole, and set the olla upright. You might need to lean it against something to steady it, if the silicone plug on the bottom hole is thick.
Let the olla set for an hour or so, and then inspect the joined rims and bottom plugged hole for leaks. That is, beads of water. It’s entirely possible that, even after just an hour, the olla has already begun doing its thing and releasing moisture through the pores of the clay.
You might notice that part of the pot has darkened compared to the very top. This is normal! Seepage is good. Leaks at the rim joint and bottom hole are not.

The olla on the left was filled halfway with water; notice how dark the bottom pot is as it becomes fully saturated with water. (Note: this photo was from the first year I made DIY ollas and used a heavy glue. Although it works, the glue does not have sufficient longevity, as it becomes brittle and cracks through weather changes. I use exclusively silicone now.)
The olla on the right is an artisan olla I bought on Etsy before deciding to make my own to save money.
If leaks are apparent, drain the olla and apply silicone to patch the leaks. And test again.
Optional: widen the fill hole
I already had a Dremel tool, so I used it to widen the hole on top of the olla where I pour water in. A wider hole makes it less messy, especially with some of the smaller pots that I use for container gardening.
Instead, you can use a funnel whose spout fits the hole.
Make sure the cover sits fairly securely on the olla
You want to cover the open hole of the olla that sits about the ground to receive water. A cover both reduces evaporation and keeps out dirt and insects throughout the growing season.
Some terracotta pots are sold with perfectly-sized saucers. These are excellent options for your olla, as the wall of the overturned saucer and its weight will keep it in place during wind and rain.
Other options:
- a large, fairly flat pebble or rock that covers the hole;
- a lid from a plastic food container (you’ll need to weight it down with something);
- a plastic food tub or soda bottle cut down to sit overturned on the olla
How to Use Homemade Ollas
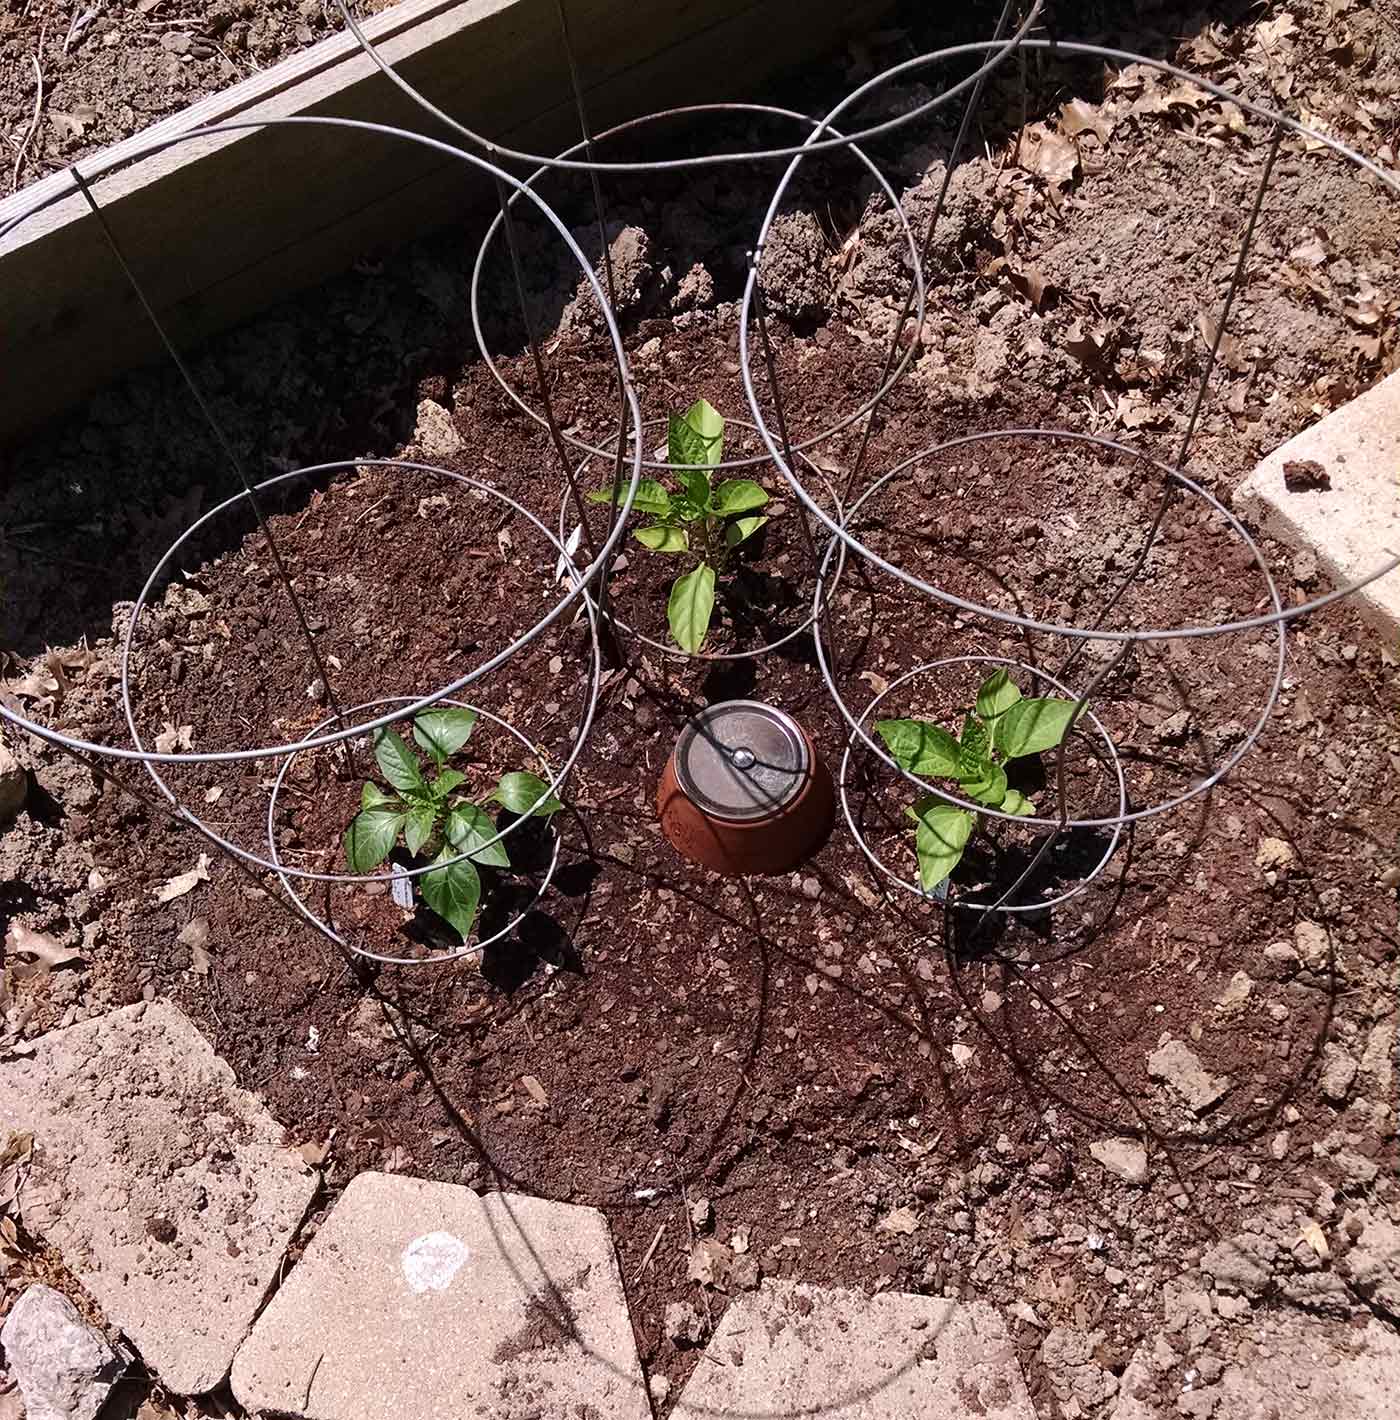
Plan on placing the olla very near to the plant. Use an olla that is large enough to match the root system of the plant it’s watering.
You’ll need to bury the olla deeply, at least 3/4ths of its length. Plant the olla at the same time as your vegetable.

Placing a cover or a piece of tape over the water hole will keep out soil as you work.
After the olla has been planted, fill with water. How often you’ll need to refill the olla depends on heat and rainfall. There’s no harm in keeping the olla filled.
I usually check my ollas every other day. For my container garden, I usually just go ahead and fill them every other day, because potted plants dry out more quickly than in-ground.
Frequently Asked Questions About Ollas and Olla Irrigation
Do ollas actually work?
Yes! And they work quite well, even for the thirstiest of plants, such as tomatoes and peppers. The roots will seek out the moisture source and grow in place.
In the photo below, which I took at the end of one growing season after tearing down my container garden, you can see how the roots of a Cherokee Purple tomato plant wrapped around the olla. The tomato was planted to the left, but the roots found the olla and grew around it.

How do I fill the olla pot?
To fill the olla pot, you can either pour water directly into the opening or use a funnel to make it less messy. It’s important to fill the olla regularly, especially during periods of hot and dry weather, to ensure that the plants receive the right amount of water.
Can ollas be used for all types of plants?
Ollas are suitable for most types of plants, including vegetables, herbs, and flowers. Ollas are especially useful for extra-thirsty vegetables, such as peppers and tomatoes.
I usually don’t use them for long rows of crops, such as carrots, potatoes, leeks, onions, or garlic — or bedding plants like parsley and cilantro — simply because of the sheer quantity needed.
But they’re perfect to bury next to singular plants that fruit repeatedly throughout the season.
How deep should I bury the olla pot?
The olla pot should be buried deep enough so that the water is delivered directly to the plant roots. A good rule of thumb is to bury the olla about 2/3rds or 3/4ths of the way into the soil, leaving the opening above the soil surface.
Make sure that the olla is large enough to match the plant’s root system. A tomato plant, for example, will send its roots as deeply as possible, and ideally, its companion olla is large enough to reach a similar depth.

In the photo above, I’m in the process of planting a tomato in a container with a large olla. I usually leave an inch or two of the olla peeking out of the surface.
Can ollas be used in areas with high humidity?
Yes. Outdoor humidity does not impact the performance of the olla, since it is buried below ground. If the ground is dry, the olla’s moisture will seep into it.
If a region receives frequent rain, the olla might not need to release its water, but it’s there for stretches of dry heat!
Can ollas be left in the ground over the winter?
This really depends entirely on your region’s climate. If the ground where you garden never freezes, then it’s probably okay to leave the ollas in place.
The disadvantage here is that, come next season, you’ll probably want to turn, amend, and/or loosen the soil before planting a new crop, and over-wintered ollas would get in the way of that.
If there is a threat for your ground to freeze, it’s better just to dig them up and store them, for longevity’s sake.

Can ollas be used in container gardening?
Yes! In fact, they are critical components of my own container garden, especially for water-thirsty plants, such as tomatoes. Ollas overcome the main disadvantage of container gardening:
Potted plants usually require more frequent watering — often every day — than in-ground plants, especially at the height of summer. In my experience, ollas make a visible difference in plant health and output.

By using ollas, you can reduce the manual watering requirements to every third or fourth day, depending on the size of the olla.
Can I use something like Gorilla glue instead of silicone?
In my experience, glues — even strong, thick glues — do not have the longevity of silicone. Technically, yes, you can use glue, but be sure to thoroughly test your ollas each season to inspect for leaks and cracks.
As an avid container gardener, I rely on ollas to help me manage my garden’s water needs, especially during the high heat of August. But my water-loving crops also thrive next to their in-ground ollas.
I hope you’ll try this project for yourself and see how ollas can fit into your gardening plans!


This is really interesting! I’ve seen versions of the stakes you mentioned, but never thought about terracotta as a continuous-release system. I have a lot of pots sitting around the shed – I’m going to try it!
I am using a single unglazed terracotta plant pot. I plug up the bottom hole with painters putty which works well. I cover it with a plastic lid However, when I bury it, the water level never goes down, even after a couple days. Am i doing something wrong?
I don’t think you’re doing anything wrong. I suspect it’s the pot’s material. One test you can do is to dig up and empty out the pot you’re using and let it dry. Then fill it halfway with water and let it sit out on a table or surface outside for the day. If the material is adequately porous, it should look like the photo above: Scroll up to the “Test the Seals” section, and find the photo with the two ollas. The olla on the left is half-filled with water, and you can clearly see that the bottom terracotta pot is saturated with water and exuding droplets.
If your pot fails the test, can you source one from somewhere else?
Great post! what size pots did you glue together? I’m guessing 4 or 6? I’m trying to decide what size to get for squash and tomatoes.
Yes, those are 4”, which I use for my tomatoes (one per plant).
I read about this a few years ago, and had gathered a few pots when I dislocated a shoulder and couldn’t use that arm during planting time – so I just used single pots and thought it worked quite well.
This was the first year I bought silicone sealant. DH got me some that fit in his caulking gun. It was really HARD to use for this senior citizen. And the ollas vary greatly in how often they need refilling, so maybe I didn’t do too great a job in application.
I painted the tops that are above ground to reduce evaporation. I had a bunch of old nail polish that did the trick.
But in the end, I’ve decided that the doubles are good for deeply rooted tomatoes, but the shallower squash/cukes/beans did better with a single pot when small or it sown directly. The single pots take more surface space, but enough of my seedlings died :/ so that wasn’t an issue.
Plus, I’m wondering about the inside of the double pots. I can scrub out my single pots every year -they get some buildup on the inside that reduces or even stops their ability to percolate water through. It will be much harder to scrub out the glued-together version.
All in all, I’m wildly in favor of ollas – not only saving water, but because I’m a night person. I can refill ollas in the heat of the day or 2am and not worry about wet foliage.
Thank you. I just learned about this type of watering and the commercial ollas are very expensive.
I know, right? I acknowledge the artistry involved in making them, but when you need several (or more!) … yeowza.
Thank you! I have a school garden with drip irrigation but I’m adding 2 raised beds which are not on the system, intentionally, so we can build our own ollas.
Your instructions are so clear and will be so much fun for my K-5 scholar
gardeners. Can there be too many ollas? Would 2.5″ pots spaced equidistant apart (given how many kids want to make them) work?
That’s so awesome – I love school gardens, I used to work for a nonprofit that ran a big one at a local high school.
From an overwatering standpoint, there cannot be too many ollas. They do a good job of controlling water output in relation to soil moisture levels.
The only downside I can think of – and it’s probably not even an issue – is to make sure that there’s not more ollas than soil near the roots of each plant.
In fact, I can see it being kind of cool at the end of the growing season: when you remove the ollas, you’ll see how the roots of the plants wrap round and round the ollas, getting moisture directly from the pots.
Wishing you good luck – so much fun!
I have been looking for a long term solution to irrigation lines by replacing them with terracotta pipes. It seems that the only ones really available are for septic systems (obviously not designed for leaking). I may have to try this method but placing them sideways and removing the entire bottom to connect them in a chain. Maybe I can find a PVC pipe to act as the refill access point.
I live in the desert and am looking for a better way to grow plants that will stay for several decades (trees, cactus, shrubs), not replanted every year. Luckily it stays above freezing here year-round.
I will be trying this method in my garden this spring. The pots are inexpensive enough to allow me to purchase several sets for my small row of tomatoes – which are in the ground rather than containers or raised beds. Love your directions – thank you for sharing!
Can these be used in areas Pacific NW where there is a lot of rain before the dryer season sets in? And would you just keep it covered during the wet season? First everything drowns and then the summer drought.
They should be totally fine. I think you can see in some of the photos that I put little lids over the fill hole, so that nothing — including dirt, insects, etc. — get in, so that the water within stays clean. I’m pro-rain-water, for sure, but I collect it elsewhere, filtered for debris, as things can get a little too splashy around the ollas. As for what’s happening underground, when the soil is totally wet, it will saturate the terracotta, but then the water levels within just hold in statis until the soil dries out.
I love that you are spreading the word about Ollas! They are simple, brilliant and absolutely more efficient than drip irrigation, soaker systems, or other systems that saturate the soil.
Great diy info . . . but, often you can buy them for about the same cost as diy. Full disclosure: I make them! onewintrynightollas.com
Your ollas and the lids are beautiful. And large. I personally don’t use ollas that big, but some gardeners would. So, we have different target audiences. My entire collection of ollas cost less than $40 to make.
Am I correct that you would use one 4″ olla for each tomato plant? But you could also use one 4″ olla in the center of multiple pepper plants? If there are 3 pepper plants are they all able to get enough roots around the pot to get water? Do all plants wrap their roots around the olla like in the picture or is that just tomatoes?
Hi from Denmark!
I would like to try this irrigation method in my raised beds where I grow flowers (cut garden). Is that possible? What size of pots for ex 120×120 raised beds?